Having spent much of the last 3 days building sessions ready for the mix stage I thought I’d share some of my workflow tips.
IO (Input - Output)
When building sessions you really need to have enough IO to allow all of the tracks to be routed accordingly. For this show the sessions aren’t too wide so I’ve been making do with a 96, 2 analog 192’s and one Digital 192. This allows 64 outputs from a Pro Tools rig.
It is possible to build the sessions without this capability but it takes much longer. Pro Tools has useful shortcut keys (shift+alt+command) for rippling outputs etc that only work if all the outputs are active.
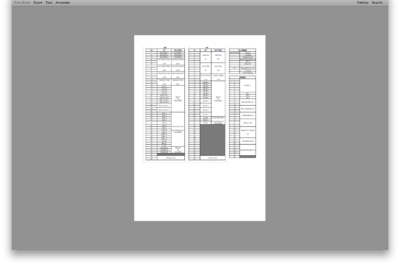
Before building the IO setup for a show I generate a spreadsheet that gives a representation of the systems so the mix techs can build the desk IO to match.
 One of my greatest wishlist items for Pro Tools is offline IO setup. Meaning that I’d like to be able to route to ‘virtual’ outputs which would mean not having to connect a whole bunch of extra boxes to my system for this purpose.
Session Template
Next stage after the IO is building session templates for the various playback machines. I tend to do this step on the mix stage itself as then I can test the output routing against the inputs to the desk.
Safest method for ensuring compatibility with the editors sessions is to take one of them (session not editor) and clear out all of the media from the tracks, import the IO settings and route the tracks accordingly. Many editors now route their tracks to busses and then output from the busses which makes building sessions harder and easier in equal measure but for different reasons.
Easier - Don’t have to worry about the tracks just the busses
Harder - Output checking is either in busses only or requires some automation manipulation to test all outputs in order.
When building these sessions I tend to create a test tone file of 1 second and 6 frames. 1kHz tone for the first second of the file then silence for the next 6 frames. I then copy and paste this down the tracks offsetting head to tail on each track.
Once this is done I provide this session file and the test tone file to the mix stage. Running through the first section then allows all outputs to be checked for routing/functionality etc and any dead outputs to be identified and offset.
It is important when building the session template that all possible tracks are built. For example if R1’s OMF only has 8 tracks but R5 has 14, then the session template needs 14 tracks built and routed.
Start Times
Session template is set to start at 00:58:00:00 which leaves 2 minutes before the Picture Start mark on most projects (this will differ depending on whether it’s a NTSC or PAL project). This is also useful later on when it comes to combining reels or incorporating stems.
I leave the test tones in the sessions as if there is a problem it makes it much easier to find than trying to read the output label on all the tracks.
As this is a template session I name it something innocuous and leave the reel as Rx.
I then place this in the project folder of each reel and proceed.
Duplicate the editing session
Before I do anything else to the editing session I always create a copy. A quick cmd+d will save a lot of trouble down the line. Only ever work with a copy of the original session!!
Prepare the edited session
After opening the copy of the edit session I go to the picture start mark select all tracks and hit shift+return, which selects everything before the start of the picture. Delete anything that is highlighted.
Next is to set the session start time. I had gotten into the habit of setting the session start time to match the picture start time (01:00:00:00 for example) as up until Pro Tools version 8 bad things could happen at the next stage, luckily this has been resolved so as long as the session start time doesn’t precede the start time of the template (00:58:00:00) then you’re good to go. Quit the Edit session and open up the template.
Once the template is open set the session start time to 2 minutes before the relevant hour. (01:58:00:00 for Reel 2 for example) this will push the test tones to that timecode.
Import Session Data
This is where the template comes into it’s own. What we have done is create a pre routed, standardly named file with full IO setup, correct session start times/formats etc.
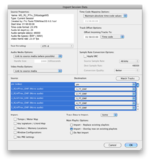 Importing session data from the copy of the edited file brings up the window to the left.
Quick run through:
Top left shows the details of the session you are importing
Mid left deals with audio and video media to copy/link/consoldiate
Next section is the tracks contained within the session you are importing
Bottom left shows other elements of the session. Markers etc.
options on top right - assuming you have followed through the instructions above should never need to be changed for this process.
Above the track listings section there is button called Match Tracks. Hitting this button should go through the track list and match each track to one in the template session.
Assuming that everything matches up (which it will do apart from the odd track) the most important box on the entire page is the one that says Some.
And heres what you need to select in that box.
Most of these setting are fairly self explanatory. Essentially what you are doing is importing the editors work into a mixer friendly format.
What you are unchecking explained:
Alternate playlists are a music feature primarily although I’ve seen some people use them for ADR. 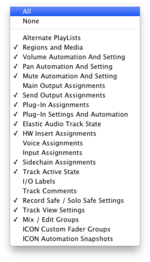
Main Output Assignments - You’ve already done the routing in the template session so not selecting this ensures that your tracks output correctly
Voice Assignments - I uncheck it because mostly our sessions are dynamic voicing and leaving it checked could result in crashes while the system tries to reassign them. Unnecessary!
Input assignments - In the template I tend to set inputs only on tracks that require them: bus returns etc. Unchecking this means that the IO is kept clean and free from editor clutter.
I/O labels - Having spent time setting up my IO labels to match the spreadsheet document having them replaced by the settings on the editors rigs is just annoying and messy.
Track Comments - Contentious issue this one. Most of the time I’ll uncheck it for the same reason as the Voice Assignments but occasionally if the editors have made use of them to eg/ clone the track names then I’ll reselect this box.
Between the track listing and the OK button there are 3 radio buttons. Replace existing, overlay and do not import. Select overlay.
Once these options are set it’s time to press OK.
Bad Things?
Until Pro Tools version 8, if you imported a session that was set to the same session start time but was blank before the hour but set the replace existing material rather than overlay existing material then it would wipe out anything that was on those tracks regardless of whether there was material or not.
Now it will only overwrite material that is after the first event of the imported session. Leaving our test tones in place either way. It is good practice however to overlay as the bug does exist in fairly recent releases that many people are actively using.
And Finish
Final step in the building process is to check that the media that the session references is something that will be copied to the playback system. Alt+O brings up the Project Browser window. The Audio Files folder that you see here is a virtual representation of the Audio files referenced by the session, NOT the actual audio files folder.
Sorting by path enables me to see quickly if there are odd references (old OMF’s, Guides or something just on the root of the system drive) and then Copy and Relink those weird references.
Once this is done, moving the session to the stage is just a case of copying the Audio Files folder, the template’d session file and any other relevant media to the stage machines.
If all goes according to plan then when the session is opened on the mix stage, all media should be found, the tracks should be routed correctly, the plugins assigned, automation enabled. cmd+J and we’re good to go…