Pro Tools 11 released. What does it do for Post?

Video Engine

As we spend so much of our time looking at video, this is huge. The improvements in the video engine open up a massive world of workflow extensions. From the ability to use MXF based video files natively within Desktop Video or output via Blackmagic or AJA video interfaces to the fullscreen mode and native playback of all quicktime formats without transcoding.

Metering!

The new default meters are Digital VU which match the System 5 in ballistics and are a vast improvement over the “Pro Tools Classic” meters (which are included for comfort). You can also have different metering on Master faders than on all other tracks if you so desire. My favorite aspect of the new metering is the Output metering you can have in the Edit window toolbar, put a faux-5.1 bus into your session and send all your tracks to it and you’ll have a Printmaster meter solution. 

Audio Engine

The new Audio Engine is not just a new name, it is smaller and leaner than DAE ever was and with that comes bigger track counts with lower overhead. 

Multiple Expanded Sends

For those TV (generalisation) mixing scenarios where you are using sends to route your tracks rather than outputs the ability to expand all of the sends out is huge. The downside is that you lose the track metering at this point but if you flip the faux 5.1 bus onto the output paths then they come back. It’s a workaround but it does work.

Faster than Real-Time Bounce

Want a backup for those virtual predubs? Knock them out in faster than real time. Try it once, you’ll love it.

More Metering!

Gain reduction Metering on every channel with a dynamics processor inserted. This is awesome and the best part is that it also displays on each track in the edit window too. 

More processing

The new audio engine allows many more intances of your favorite plugins than ever before, the AAX2 format is tuned like one of those car engines you all love designing so much.

Summary

If you are still not sold then the only thing I can advise you to do is to download 10.3.6 and then install the PT11 demo. I’ reasonably certain that your plugins won’t all be available, but that will change over the next few weeks and months but try it for yourself. I’ll be posting some updated templates with PT11 tweaks in the coming weeks. More to follow…

Pro Tools 11 released. What doesn't it do?

By now you have probably: Seen the announcement of PT11 from NAB 2013, read countless blogs and reviews about the new features and maybe even attended a pre-launch public demo with question and answer time.

Not a whole heap to add but here’s the hit points.


  • 64-bit memory space

  • 32-bit float mix engine (yes they are different things)

  • New metering options including Gain Reduction metering

  • More undo’s for all the errors that you can make faster now

  • More VI’s can be used

  • New Audio Engine

  • New Video Engine

  • Faster than Realtime Bounce

  • …and much more


But what doesn’t it do? This is not a bash of Avid in anyway rather a way to quickly answer a lot of questions that begin with “So can you…” and end with “…yet?”


  1. So can you…have multiple video windows…yet?
    No, the new video engine is vastly improved in it’s framework and has great features built into it like Draft and Best Performance video views as wel as Full Quality. It can have MXF based video files directly in the timeline as well as a number of new and developing industry-supported formats such as OP1A. you can mirror your picture to Desktop Video and external hardware but you can’t yet have two different videos displayed in your session windows.

  2. So can you…have multiple sessions open…yet?
    No, and actually in my humble opinion this is a good thing. I know there are captivating reasons to be able to do it but I like the single session operation, I used to use Logic and this is one thing I definitely do not miss.


  3. So can you…have bin/folders in the clip list…yet?
    No. I’d really love to have a compelling reason for this, what exactly does the in paradigm add to your Pro Tools session? Folders I can get on board with to a point but if you can convince me of bins please feel free to comment. The new workspace is a great start at a new database format for the software, it is much faster in searching and indexing drives and the searching is great too…different but great.


  4. So can you…freeze tracks…yet?
    No, not really although if you 1 to 1 your outputs to a desk then you could offline bounce 16 of them at a time and reimport. Not the same I know but 4x16 track width offline bounces will take less time than 1x64 track realtime bounce or rerecord pass.


  5. So can you…have mulitple marker tracks…yet?
    No, if you are importing from an media composer created omf/aaf then you’ll be able to import the different marker colors from that file but you can’t create different color markers or multiple marker tracks yet.


  6. So can you…run VST plugins…yet?
    No. AAX2 is the one and only plugin format in Pro Tools 11.


  7. So can you…have clip based effects or panning…yet?
    No. Clip based gain is the one man show of clip based realtime processing.


  8. So can you…create a folder of tracks…yet?
    No.


  9. So can you…export part of a session…yet?
    No, Save Session Copy will do selected tracks only though. My workaround is to duplicate a set of tracks and then top and tail the media needed. Shift+enter will select to the start of the session from edit point, shift+alt+enter will select to the end of the session from the edit selection point. Ok, it’s a 5 step process but it’s called a ‘work’around…


  10. So can you…Send to Avid after you crash…yet?
    Yes, yes you can. If you crash it, report it. Help them help you people. It’s free to submit a crash report and will help the product get more stable.

So there you have it. 10 quick answers to 10 questions I heard after PT10 release. Now, quit reading and go install PT11. You don’t need to uninstall PT10 ‘cause…they co-install. Can’t run simultaneously but then who would want multiple sessions open at one time, right? Oh…wait.

Mix Prep

Having spent much of the last 3 days building sessions ready for the mix stage I thought I’d share some of my workflow tips. 

IO (Input - Output)

When building sessions you really need to have enough IO to allow all of the tracks to be routed accordingly. For this show the sessions aren’t too wide so I’ve been making do with a 96, 2 analog 192’s and one Digital 192. This allows 64 outputs from a Pro Tools rig. 

It is possible to build the sessions without this capability but it takes much longer. Pro Tools has useful shortcut keys (shift+alt+command) for rippling outputs etc that only work if all the outputs are active. 

Before building the IO setup for a show I generate a spreadsheet that gives a representation of the systems so the mix techs can build the desk IO to match.
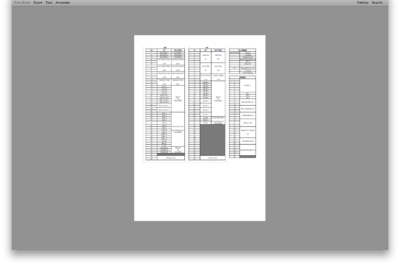
One of my greatest wishlist items for Pro Tools is offline IO setup. Meaning that I’d like to be able to route to ‘virtual’ outputs which would mean not having to connect a whole bunch of extra boxes to my system for this purpose.

Session Template

Next stage after the IO is building session templates for the various playback machines. I tend to do this step on the mix stage itself as then I can test the output routing against the inputs to the desk. 

Safest method for ensuring compatibility with the editors sessions is to take one of them (session not editor) and clear out all of the media from the tracks, import the IO settings and route the tracks accordingly. Many editors now route their tracks to busses and then output from the busses which makes building sessions harder and easier in equal measure but for different reasons. 

Easier - Don’t have to worry about the tracks just the busses

Harder - Output checking is either in busses only or requires some automation manipulation to test all outputs in order. 

When building these sessions I tend to create a test tone file of 1 second and 6 frames. 1kHz tone for the first second of the file then silence for the next 6 frames. I then copy and paste this down the tracks offsetting head to tail on each track. 

Once this is done I provide this session file and the test tone file to the mix stage. Running through the first section then allows all outputs to be checked for routing/functionality etc and any dead outputs to be identified and offset. 

It is important when building the session template that all possible tracks are built. For example if R1’s OMF only has 8 tracks but R5 has 14, then the session template needs 14 tracks built and routed. 

Start Times

Session template is set to start at 00:58:00:00 which leaves 2 minutes before the Picture Start mark on most projects (this will differ depending on whether it’s a NTSC or PAL project). This is also useful later on when it comes to combining reels or incorporating stems.

I leave the test tones in the sessions as if there is a problem it makes it much easier to find than trying to read the output label on all the tracks. 

As this is a template session I name it something innocuous and leave the reel as Rx. 

I then place this in the project folder of each reel and proceed.

Duplicate the editing session

Before I do anything else to the editing session I always create a copy. A quick cmd+d will save a lot of trouble down the line. Only ever work with a copy of the original session!!

Prepare the edited session

After opening the copy of the edit session I go to the picture start mark select all tracks and hit shift+return, which selects everything before the start of the picture. Delete anything that is highlighted. 

Next is to set the session start time. I had gotten into the habit of setting the session start time to match the picture start time (01:00:00:00 for example) as up until Pro Tools version 8 bad things could happen at the next stage, luckily this has been resolved so as long as the session start time doesn’t precede the start time of the template (00:58:00:00) then you’re good to go. Quit the Edit session and open up the template.

Once the template is open set the session start time to 2 minutes before the relevant hour. (01:58:00:00 for Reel 2 for example) this will push the test tones to that timecode.

Import Session Data

This is where the template comes into it’s own. What we have done is create a pre routed, standardly named file with full IO setup, correct session start times/formats etc. 
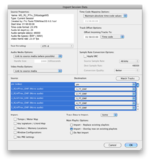
Importing session data from the copy of the edited file brings up the window to the left. 

Quick run through:
Top left shows the details of the session you are importing
Mid left deals with audio and video media to copy/link/consoldiate
Next section is the tracks contained within the session you are importing
Bottom left shows other elements of the session. Markers etc.

options on top right - assuming you have followed through the instructions above should never need to be changed for this process. 


Above the track listings section there is button called Match Tracks. Hitting this button should go through the track list and match each track to one in the template session.

Assuming that everything matches up (which it will do apart from the odd track) the most important box on the entire page is the one that says Some.

And heres what you need to select in that box.

Most of these setting are fairly self explanatory. Essentially what you are doing is importing the editors work into a mixer friendly format.

What you are unchecking explained:

Alternate playlists are a music feature primarily although I’ve seen some people use them for ADR.
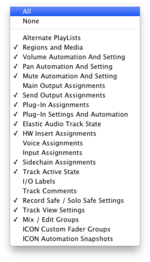
Main Output Assignments - You’ve already done the routing in the template session so not selecting this ensures that your tracks output correctly

Voice Assignments - I uncheck it because mostly our sessions are dynamic voicing and leaving it checked could result in crashes while the system tries to reassign them. Unnecessary!

Input assignments - In the template I tend to set inputs only on tracks that require them: bus returns etc. Unchecking this means that the IO is kept clean and free from editor clutter.

I/O labels - Having spent time setting up my IO labels to match the spreadsheet document having them replaced by the settings on the editors rigs is just annoying and messy. 

Track Comments - Contentious issue this one. Most of the time I’ll uncheck it for the same reason as the Voice Assignments but occasionally if the editors have made use of them to eg/ clone the track names then I’ll reselect this box. 

Between the track listing and the OK button there are 3 radio buttons. Replace existing, overlay and do not import. Select overlay.

Once these options are set it’s time to press OK.

Bad Things?

Until Pro Tools version 8, if you imported a session that was set to the same session start time but was blank before the hour but set the replace existing material rather than overlay existing material then it would wipe out anything that was on those tracks regardless of whether there was material or not. 

Now it will only overwrite material that is after the first event of the imported session. Leaving our test tones in place either way. It is good practice however to overlay as the bug does exist in fairly recent releases that many people are actively using. 

And Finish

Final step in the building process is to check that the media that the session references is something that will be copied to the playback system. Alt+O brings up the Project Browser window. The Audio Files folder that you see here is a virtual representation of the Audio files referenced by the session, NOT the actual audio files folder.

Sorting by path enables me to see quickly if there are odd references (old OMF’s, Guides or something just on the root of the system drive) and then Copy and Relink those weird references. 

Once this is done, moving the session to the stage is just a case of copying the Audio Files folder, the template’d session file and any other relevant media to the stage machines. 

If all goes according to plan then when the session is opened on the mix stage, all media should be found, the tracks should be routed correctly, the plugins assigned, automation enabled. cmd+J and we’re good to go…

Picture Codecs

Inspired by : http://www.elementaltechnologies.com/blog/primer-inter-vs-intra-frame-video-compression

What is the best picture codec for use in Pro Tools?

Many picture houses try to supply us with H.264 codec as this ‘looks great’ and has small file sizes. While this might be true, working with it in Pro Tools becomes a nightmare. Scrubbing fails to operate smoothly, moving round the timeline is positively glacial and altogether it’s more hassle than it’s worth. 

As stated in the above blog post Intra frame images are single snapshots of each frame of the movie. This means that for each second of picture there will be 24 frames of video (assuming a 24frame project, replace this figure with 29.97, 30, 25, 23.976 as appropriate).

Why is this good?

This is good because the computer only has to process that frame. It doesn’t need to think about frame 10 if it’s on frame 23 meaning that scrubbing, timeline jumping… everything about the operation of the DAW is smoother. 

The various QuickTime codecs that are available at this point become reasonably similar, certainly in terms of processing requirements. 

As a company we have tended to stick with DV based codecs for the vast majority of our projects. As stated in a previous entry we use MPEG Streamclip for converting the picture if a picture department refuse/are not able to produce a DV codec for us. The most common codec thast we have been using recently is the DVC PRO NTSC. This is a DV based NTSC (29.97) codec that is well suited for the 23.976 workflows that have been prolific over the past few years. 

In the US they tend to work with Photo JPEG files. These have a higher picture clarity due to each frame being a JPEG image of the video footage. There is a trade off here with file size. a DVC file of 20 minutes comes to around 1.6GiB while a PhotoJPEG comes in at more like 2.8GiB. It’s not a massive difference but it adds up over the course of reels and 15-20 versions (excluding VFX updates).

What else is there?

In October of 2009 Avid released a new codec for QuickTime that has yielded some impressive results in testing. It’s called the Avid DNXHD Codec for QuickTime and it is wonderful. In my opinion it looks much better than the H.264 equivalent and it has NO additional overhead to a system. 

A standard photo JPEG/DVC Pro QuickTime requires 8-10% of a CPU to playback within Pro Tools. The Avid DNXHD codec for QuickTime plays back with maximum (in testing) 8% CPU usage. 

For the next show that we do I’m going to try to specify this as our preferred option as it is closer to the playback specification for the stage. It’s only downside is that files are larger. 20 minute reel will be in the region of 4.5GiB. I figure we’l just keep fewer versions ;)